Thanks to Home File Servers users can enjoy a convenient option to store all the data they accumulate, without requiring a dedicated computer. They usually are available as DLNA media servers as well. Here we will tell you how to configure a Home File Server, in case you are thinking about getting one. You may also want to consider backing up your NAS to a cloud storage provider.
1. Choose a Name for the Home File Server
You don’t need to spend too much time thinking about the name as UPnP (Universal Plug ‘n Play) will enable the server to be easily located and recognized within your home network. Even if you can’t remember the name, you will be able to find it in the list of your devices, in Control Panel, Hardware and Sound, Devices and Printers.
2. Complete Network Setup
This would only require you to choose the IP address method that the NAS (Network Attached Storage) should use. You can select between Dynamic Host Configuration (DHCP) or a static IP address. In general, you can let the router assign the IP address with DHCP. The majority of devices available nowadays including your NAS, support UPnP and the NAS would be located automatically by your devices without requiring you to specify it’s IP address. All and all, DHCP is the best option to select in most cases.
3. Multiple Disk Drive Options
If you have a home file server enclosure with one or more hard drives, this option will work for you. The configuration options depend on the vendor and you could configure them as follows:
Mirrored drives: in this case, both drives are maintained as exact copies of each other. While you only get half the storage capacity of both drives, you also get complete automatic backups of your NAS whenever needed.
Striped Drives: These are also known as RAID and in this option, parts of each file are stored on each drive. This provides higher speed and greater storage capacity, but if one drive stops working you will not be able to access any data at all. If you opt for this arrangement, it is important that you back up your NAS regularly.
Spanned Drives: With Spanned Drives you can use both drives as one large drive and files are not striped over both disks. Although the speed is not improved, if one drive fails, only half of the data would be lost. You will still need to make sure that your NAS is backed up, which is why you would be better off choosing the Striped drives as they offer a speed advantage.
JBOD: This stands for Just a Bunch of Disks and it provides access to each disk separately. You can decide which drive stores your data and backup only the important files. Non-critical data can be stored on the other drive.
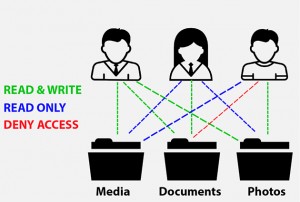
4. Users and Folder Permissions
If your technical knowledge is limited or non-existent, you will struggle with this part of the setting. Fortunately, there is a way to keep things simple when you are getting started with a home file server.
Create a user account and folder for everyone in your household and grant them complete Read-Write permissions.
You can set up a Family folder and grant all family members Read-Write permissions. In this general area, everyone will be able to share files.
Set up a Parent area and a Parent group where you can store files with restricted access. They would only be available for members of the group.
You can also set up a Media area where you can store family pictures and videos. Everyone can get permission to Read, but only members of the Parent group should get permission to Write as well. This will help to prevent accidental deletion of files.
Set up an administrator account that has Read-Write permissions to all folders and that can be used for backups.
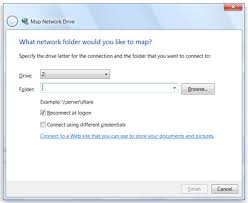
Mapping of Drives
After you have finished setting up the user accounts, each user’s computer or login account that shares a computer, will need to be mapped as a network drive. To do this in Windows, you can go to File Explorer, then Computer, Map Network Drive and select “\your-Home-File-Server-Namename-of the-folder. You will be asked to enter a username and password.
Conclusion
You don’t need to be an expert to set up a NAS and as long as you do things right from the start, you will not need to spend too much time in maintenance. Just make sure that you select the option that better suits and follow the steps.