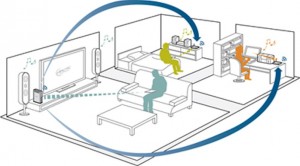
DLNA or Digital Network Alliance is a non-profit trade organization that was established in 2003 with the purpose of setting the standards that allow devices to share media content. The DLNA certification is granted to media players and media servers and it enables compatibility between devices produced by different manufacturers. Thanks to DLNA, you can access your music, videos and photos across your home computer, mobile devices and other electronics. DLNA is like a home entertainment media haven that makes your media available on all your devices.
The DLNA standard is applied to media servers, media controllers, media players and the file formats for photos, audio and video that the devices support. Since DLNA works in combination with UPnP (Universal Plug ‘n Play), DLNA is often known as DLNA/UPnP. Other options like UPnP-AV will also work with DLNA, although these devices are not certified and may not offer the whole range of features that DLNA supports. We will take a closer look at the parts of DLNA Media Home, before going through the steps to set up a DLNA Media Home system.
DLNA Media Server
The DLNA Media Server is where the content library is stored and it also provides streaming media services. Since some media files such as videos can be quite big, the media server requires a large storage capacity. Usually, DLNA certified media servers are available as Network Attached Storage devices or NAS. NAS are systems that consist of one or more hard drives and that are connected to your network through an Ethernet connection. It is possible to get NAS and drives as part of the same package, or you can get the enclosure on its own and then buy the drives separately. NAS devices can be used to store computer files and backups and they usually feature 1TB (or higher) drives.
Windows has a built-in media server, but it has limited functionality. If you need a more advanced option, you would be better off looking for third party media servers. There are some free open source media servers, as well as premium software. The options include Twonky, DivX, Kodi, Firefly and TVMOBiLi. Kodi (formerly known as XBMC) is a free open source media server that is usually recognized as an advanced solution on the same level as some of the commercial options.
DLNA Media Rendered Hardware
The DLNA certified digital media renderer is the device that plays the media. It can be a computer connected to a stereo system and TV set, a computer with speakers and DLNA media player software, an electronic appliance that has audio and video outputs, or a DLNA TV with an Ethernet connection.
DLNA Media Controller
This is the device that is used to browse through the media and to make a selection. It is usually integrated to the player, but it can be a completely independent unit, working like a remote control. This would allow you to choose content using a computer to play it from the media server to a rendered in a different area of your house. It is possible to use mobile devices such as tablets as remote controls for your media player.
DLNA Digital Media Players
DLNA Media Players works as both as controller and renderer. Gaming consoles are a perfect example of this as they can play media content and can also be used to select it.
In order to comply with the DLNA standard, DLNA devices are required to support Universal Plug and Play, this helps to make the setup easier and more convenient. This protocol also provides visibility for other PCs within your home network, which allows the DLNA Media Server and its clients to recognize each other. This means that unless you want to customize some options, the configuration required is minimal.
Setting Up a DLNA Media Server
First you will need to connect the DLNA media server to the network and turn it on.
You should be able to see it on your computer. Windows 8 users can go to Start, then Devices and Printers, select Add a Device and the DLNA Media Player will appear. If you click the DLNA Media Player icon, a browser window will be opened and the configuration screen will pop up. Here you can follow the manufacturer’s instructions to set it up.
Setting Up a DLNA Media Player
The first step is to connect the DLNA media server to the network and turn it on. Then you will need to connect it to output devices like a TV set and sound system. You will be able to see it on your computer. If you have Windows 8. you can go to Start, then Devices and Printers/Add a Device and the DLNA Media Server will appear. A simple option is to use a Windows 8 computer as the server, controller, renderer or player. If you have spare computers, you can use them to set up everything without getting any additional equipment. However, if your prefer a more compact and convenient arrangement, the best option is to opt for appliances, which can also be faster and easier to use.
DLNA Media Renderer Considerations
There are some things that you need to check before getting a DLNA media server. First of all, think about where you will set it up and where will the player be located. You need to test the speed of your network between the media server and the player, keeping in mind if the connection will be Wireless or via Ethernet. If the speed is below 20Mbps, you will need to improve your network before setting up the DLNA media server in order to get the most out of it.
It is also important to check that the interfaces on the media player are compatible with those on the A/V equipment you intend to use. In audio equipment, look for S/PDIF (optical), phono, coaxial and HDMI. When it comes to video, look for S-video, component, composite and HDMI.